🧠 X Node Mini — Setup Guide
Your personal Bitcoin Full Node, powered by Umbrel
Built for privacy, sovereignty, and the true Bitcoin experience.
📦 What’s in the Box
-
X Node Mini (Raspberry Pi 5 running Umbrel OS with Bitcoin Core preloaded)
-
Power supply
⚙️ Step 1: Connect and Power On
-
Connect an Ethernet cable from your X Node Mini to your router or network switch.
⚡ Ethernet is faster and more stable than Wi-Fi — especially during blockchain sync.
-
Plug in the power supply. The device will automatically boot up.
-
Wait 1-2 minutes for it to start fully.
🖥️ Step 2: Access the Umbrel Dashboard
Once your node is powered and online:
Option A — From a Computer
-
Open your web browser.
-
Go to
If that doesn’t load, log in to your router, find the device called “umbrel,” and use its IP address, for example:
Option B — From a Phone or Tablet
-
Make sure your phone is on the same Wi-Fi network as the X Node Mini.
-
Open your browser and go to
umbrel.local.
🔐 Step 3: Log In to the System
When first prompted:
-
Username:
root -
Password:
123456
You can go to your settings and see your IP address, as well as change your username and password.
🪙 Step 4: Sync Your Bitcoin Node
-
Once logged into Umbrel, you’ll see the Bitcoin Node app already preinstalled.
-
Click Launch to open it.
-
Bitcoin Core will begin synchronizing the blockchain.
-
The full sync can take several hours depending on your internet speed.
-
Keep the X Node Mini powered and connected to the internet continuously.
-
You can monitor progress anytime from the Umbrel dashboard. Once completed, you are now actively running the Bitcoin Network!
⚒️ Step 5: Set Up Your Personal Mining Pool (via Public Pool App)
Your X Node Mini can run your own personal or family mining pool directly from Umbrel — using the official Public Pool app. If it isn't pre-downloaded on your X Node Mini, you can easily download it in the Umbrel App Store for free.
🔧 Step 5.1: Configure Your Miners
-
Open Public Pool on the Umbrel Dashboard
-
It will display your node's stratum host / port number.
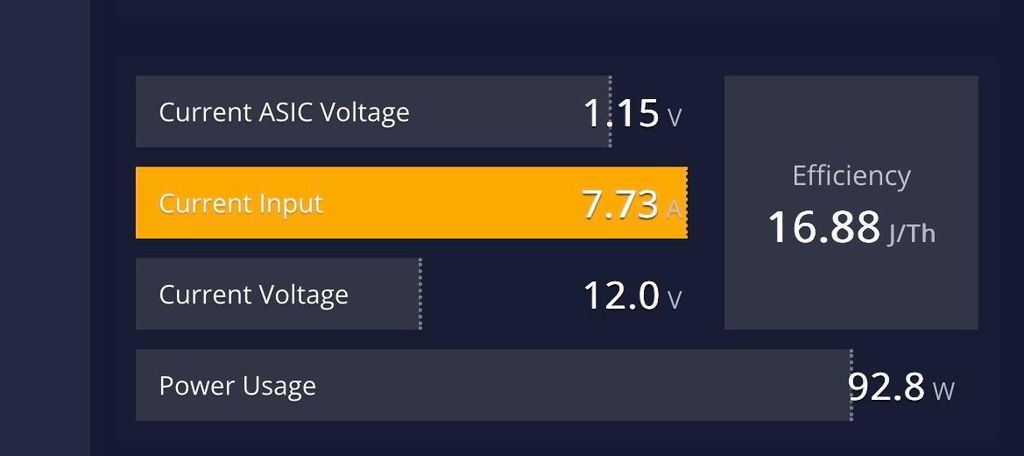
For example:stratum+tcp://umbrel.local:2018username: <your BTC address>.<worker name>, password: x - Open your miner’s configuration page.
-
Use the settings from above:
-
Pool URL:
-
Username (worker): any name you like (e.g.,
miner1) -
Password:
x
-
-
Save and restart your miner.
Your miner will now connect directly to your own pool — your hashes will contribute to finding blocks through your own Bitcoin node.
If a block is found, the reward is paid to your configured payout address. 🎉
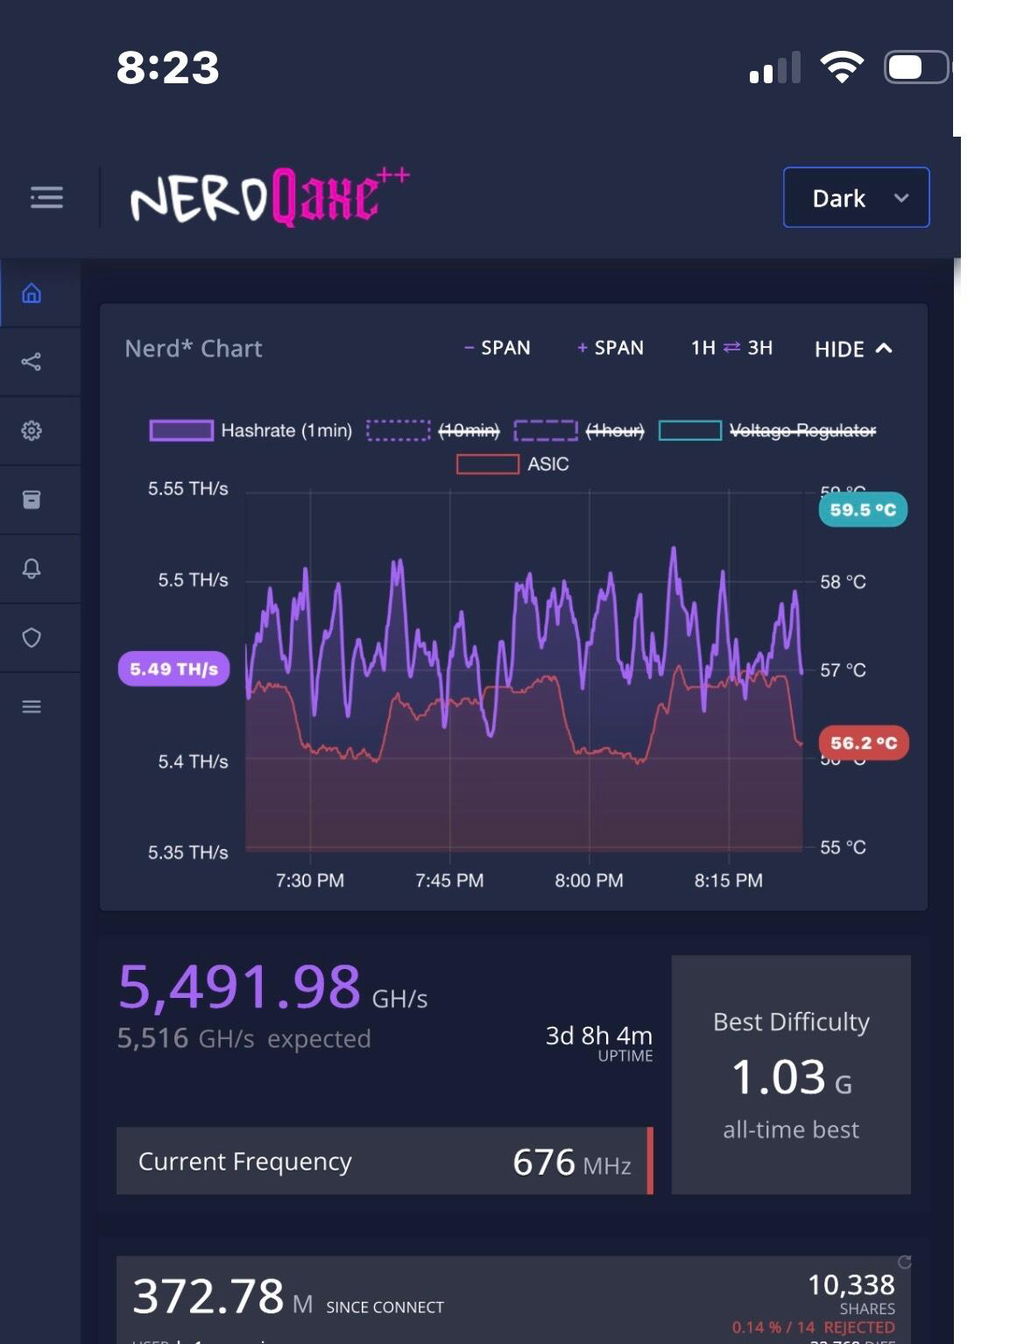
📊 Step 5.4: Monitor Your Pool
The Public Pool dashboard shows real-time stats:
-
Connected miners
-
Hashrate and shares
-
Block submissions
-
Pool uptime
You can view all this within the Umbrel interface — no terminal or coding required. Just add the widget to your home screen if it isn't already there!
🚀 You’re Done!
You now have:
✅ A fully synced Bitcoin full node
✅ A private mining pool powered by your own hardware
✅ Local control over validation, rewards, and privacy
Welcome to true Bitcoin sovereignty — all running on your X Node Mini.
Get your personal full Bitcoin Node
❤️ Support
-
Umbrel Help Center: https://umbrel.com/
-
Public Pool Documentation: https://web.public-pool.io/
-
Bitcoin Merch Support: support@bitcoinmerch.com